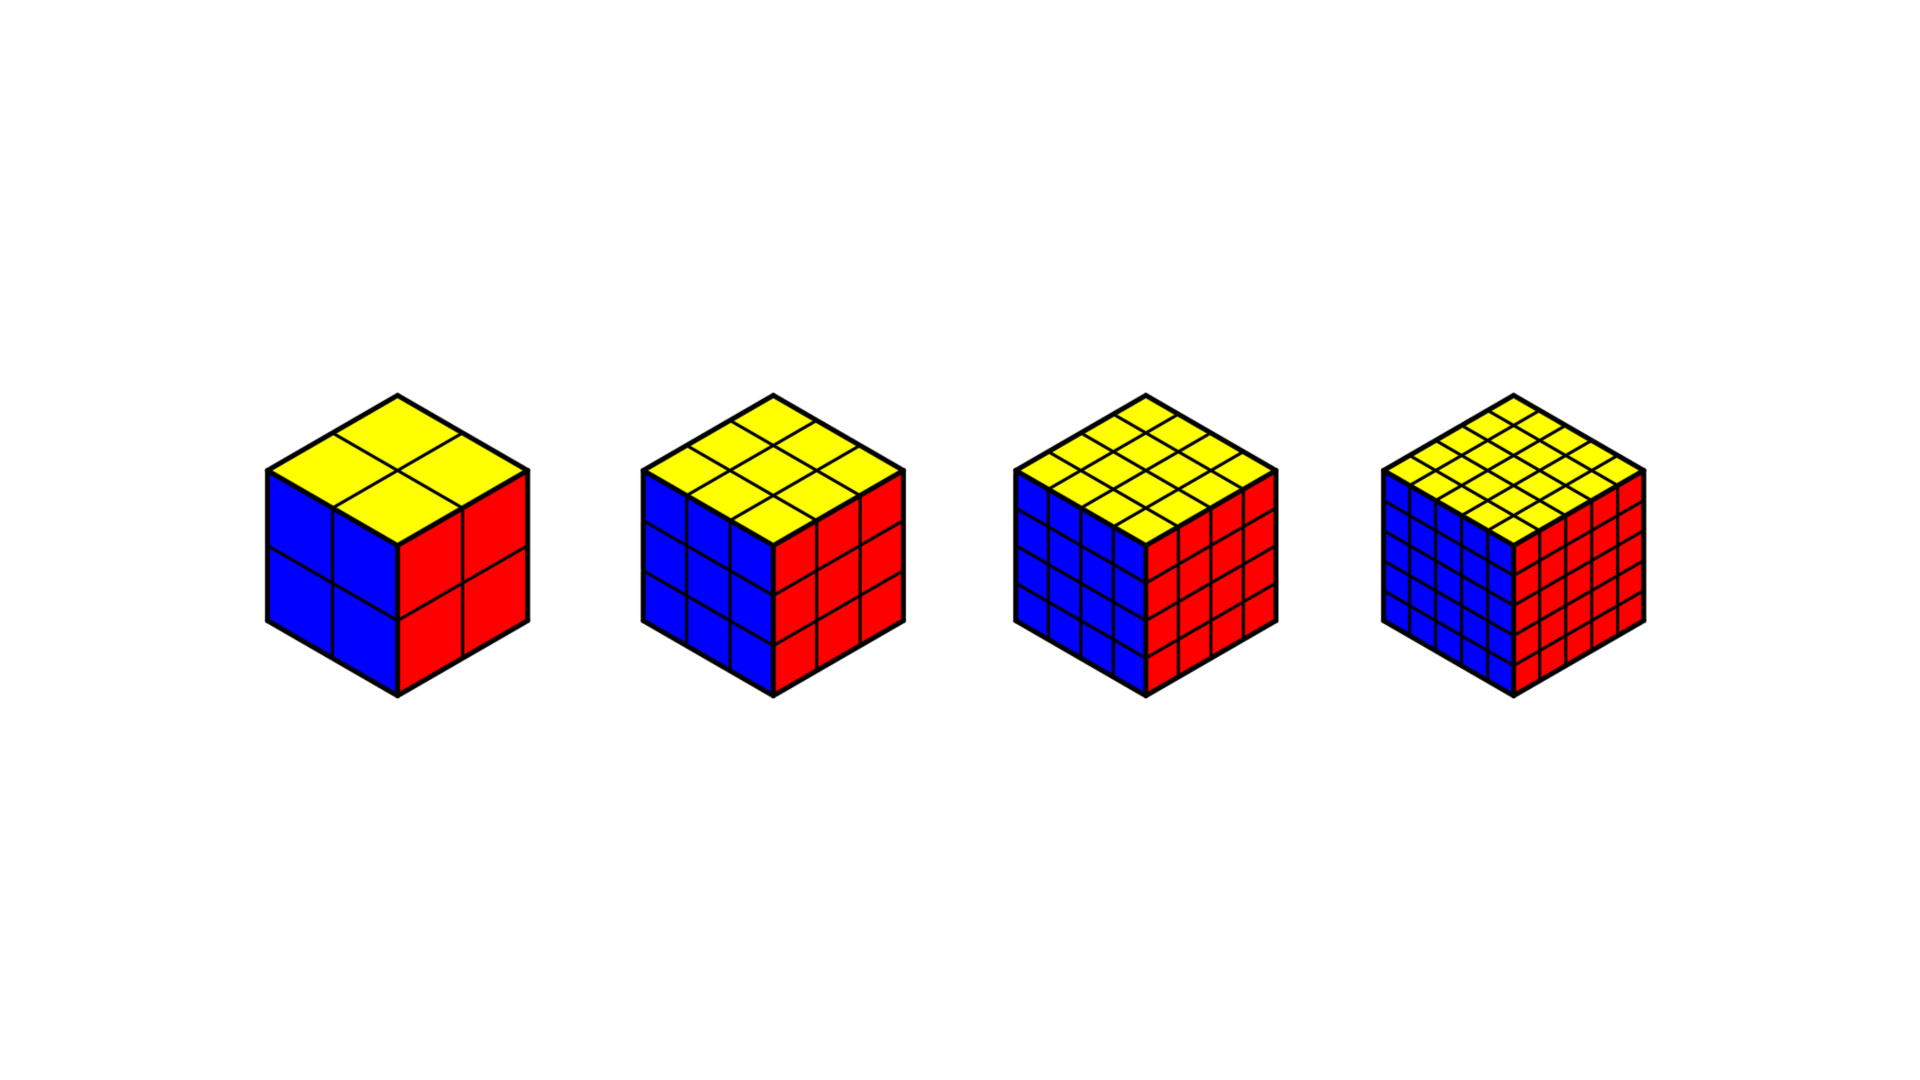
Table of Contents
All States, Transformations and Solving Steps for the Top Face of a 3×3 Rubik’s Cube
目录
I. Basics of the Rubik’s Cube ⚓︎
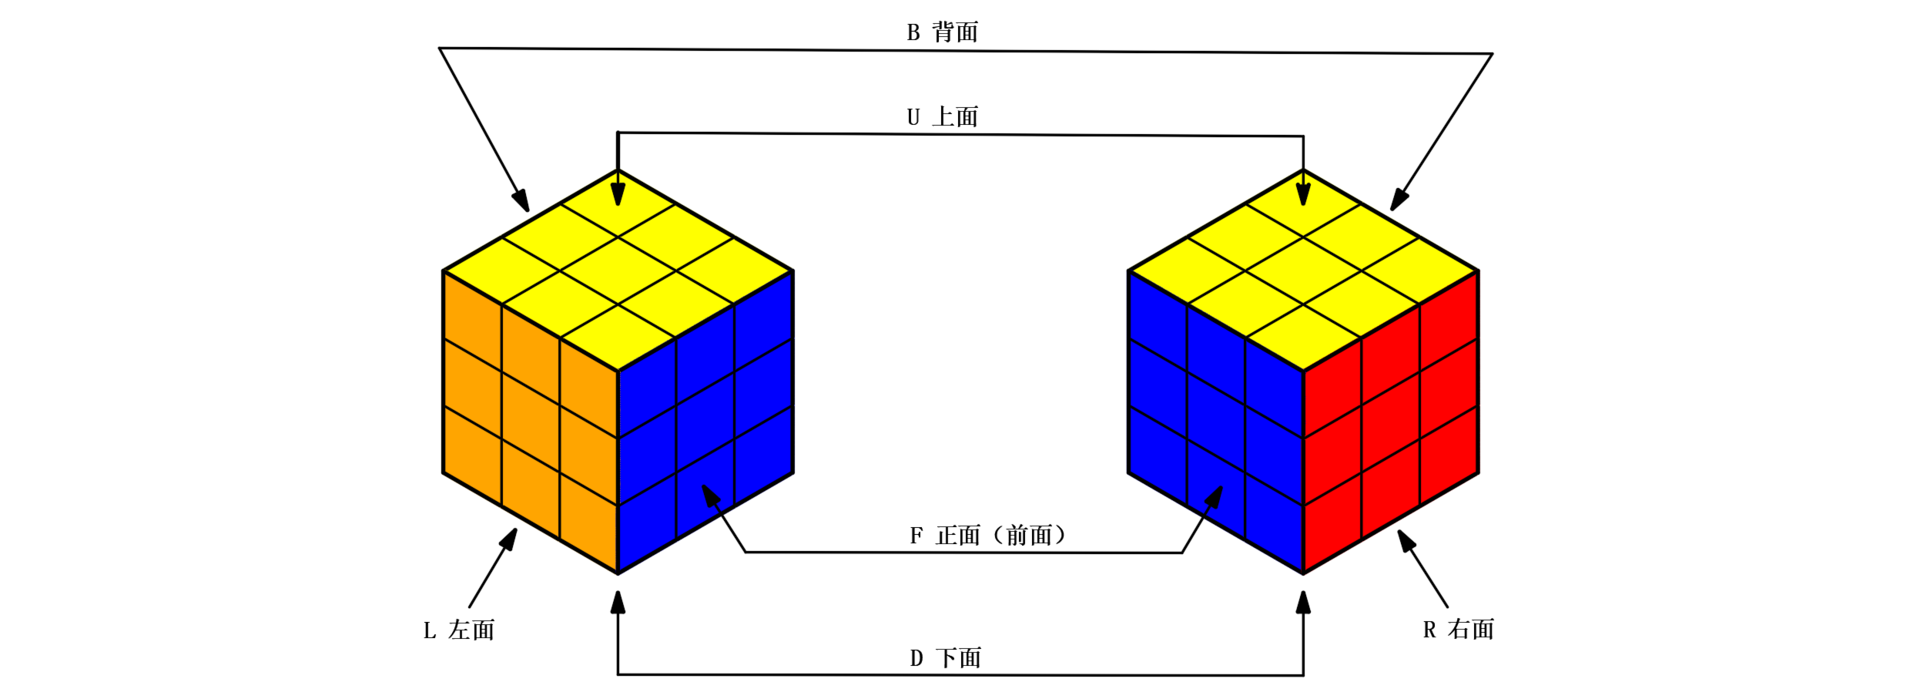
1. Rotating Surface ⚓︎
| Formula | Rotating Surface |
|---|---|
| U | Up |
| D | Down |
| L | Left |
| R | Right |
| F | Front |
| B | Back |
2. Rotation Direction and Angle ⚓︎
| Formula | Rotation direction and Angle |
|---|---|
| F | Rotate the Front face clockwise 90° |
| F’ | Rotate the Front face counterclockwise 90° |
| F2 | Rotate the Front face clockwise 180° (F2 = F’2) |
| M₂R | Rotate only the 2nd right inner layer clockwise 90° |
| T₂R | Rotate the front two right layers together clockwise 90° |
3. International Color Scheme ⚓︎
- Note: Generally, we choose the front side as the front and the white surface as the bottom.
II. 3x3 Rubik’s Cube ⚓︎
1. Solve the Bottom Layer ⚓︎
1.1 Solve the Bottom Cross ⚓︎
Formula 1-2: R' D R (Right side) / L D L' (Left side)
The process of solving the bottom layer cross involves two steps: solving the bottom layer cross itself and aligning the colors of the side edges. The situations for solving the bottom layer cross are diverse and the process is flexible. There is no unified formula. The general approach can be divided into two types:
- Method 1: Solve the bottom cross and align side edge colors simultaneously (white center as the top face)
- First rotate one white edge piece to the white area of the top face, and align the other color of this edge piece with the color of the side center piece.
- Find the edge pieces with white and the same color as the side center piece. Only use Rubik’s cube formulas R, F, B, D (and their inverses) to move them to the top face. Be careful not to mess up the edge pieces already aligned with the side center pieces.
- The next step is the same as the above operation, but only three faces can be rotated. Take care not to disturb the edge pieces that have been aligned with the side center pieces.
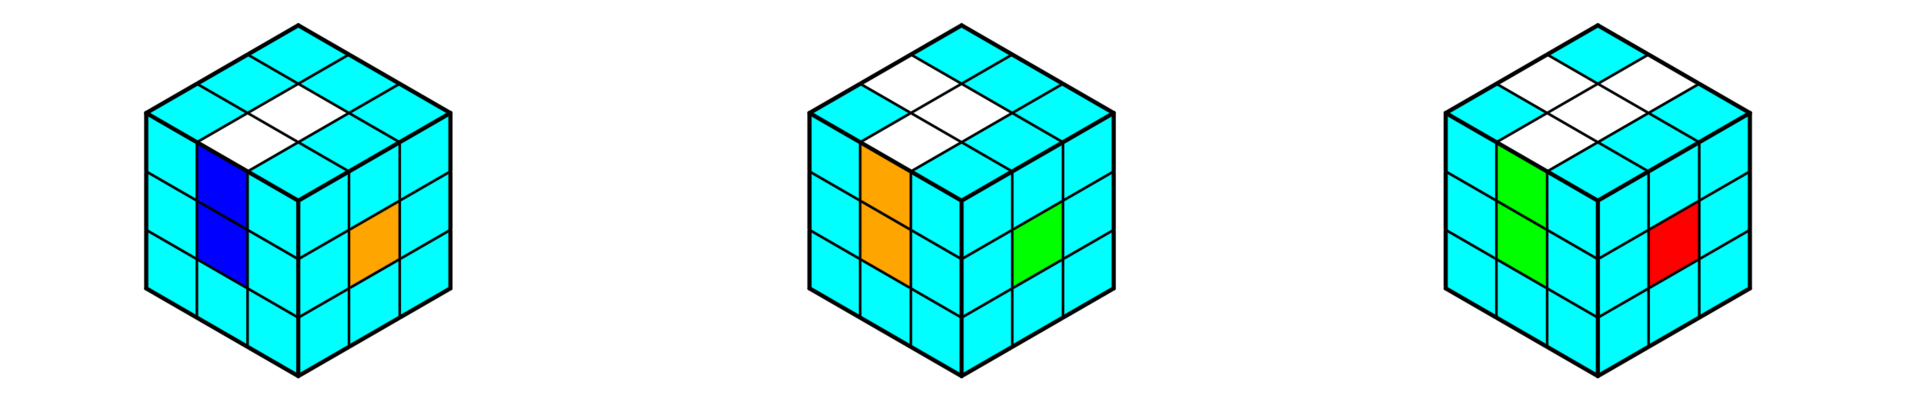
- The last step follows the same rule, yet only two faces can be rotated. Do not disrupt the pre-aligned edge pieces.
- If the following situation occurs, use Formula 1-1 to solve it.

- If the target edge piece stays in the middle of the solved face, apply Formula 1-2 to move the target edge piece down to the bottom layer before you continue to solve the cube.

- Method 2: Solve the bottom cross and align side edge colors in separate stages (yellow center as the top face)
- Ignore the other color of edge pieces, and flip all edge pieces containing white to the top face with the yellow center.
- Rotate the top layer to align the non-white color of each top edge piece with the corresponding side center color.
- After color alignment, directly rotate this side layer 180 degrees to flip the white edge piece down to the white bottom face.
- Repeat this step until all white edge pieces are flipped onto the white bottom face.

1.2 Solve the Four Bottom Corner Pieces ⚓︎
Formula 1-4: F D2 F' D' (Right side) / F' D2 F D (Left side)
- Case 1: There is a white-containing corner piece on the bottom layer of the side face
Rotate the bottom layer to turn the white side to the front face. Make the right (left) color of the corner piece match the center color of the right (left) face, and the bottom color of the corner piece match the center color of the front face. Use Formula 1-3 to solve it.

- Case 2: There is a white-containing corner piece on the top layer of the side face
Use Formula 1-3 to move the white corner piece on the top layer down to the bottom layer, then follow the steps of Case 1 to solve it. (Color alignment is unnecessary in Case 2, as it may disturb the already aligned side edge pieces.)

- Case 3: There is a white-containing corner piece on the bottom face
Rotate the bottom layer to align the other two colors of the white corner piece with the center colors of their adjacent faces respectively. Apply Formula 1-4 to convert this case to Case 1, then use Formula 1-3 to solve it. (The position of the white tile in Case 3 cannot distinguish left or right clearly; it only depends on the selected front face.)


2. Solve the Middle Layer ⚓︎
As shown in the figure below, solving the middle layer covers three scenarios: right shift, left shift and side edge flip. (There are many available formulas for solving the middle layer, and you can pick the ones that suit you for practice.)
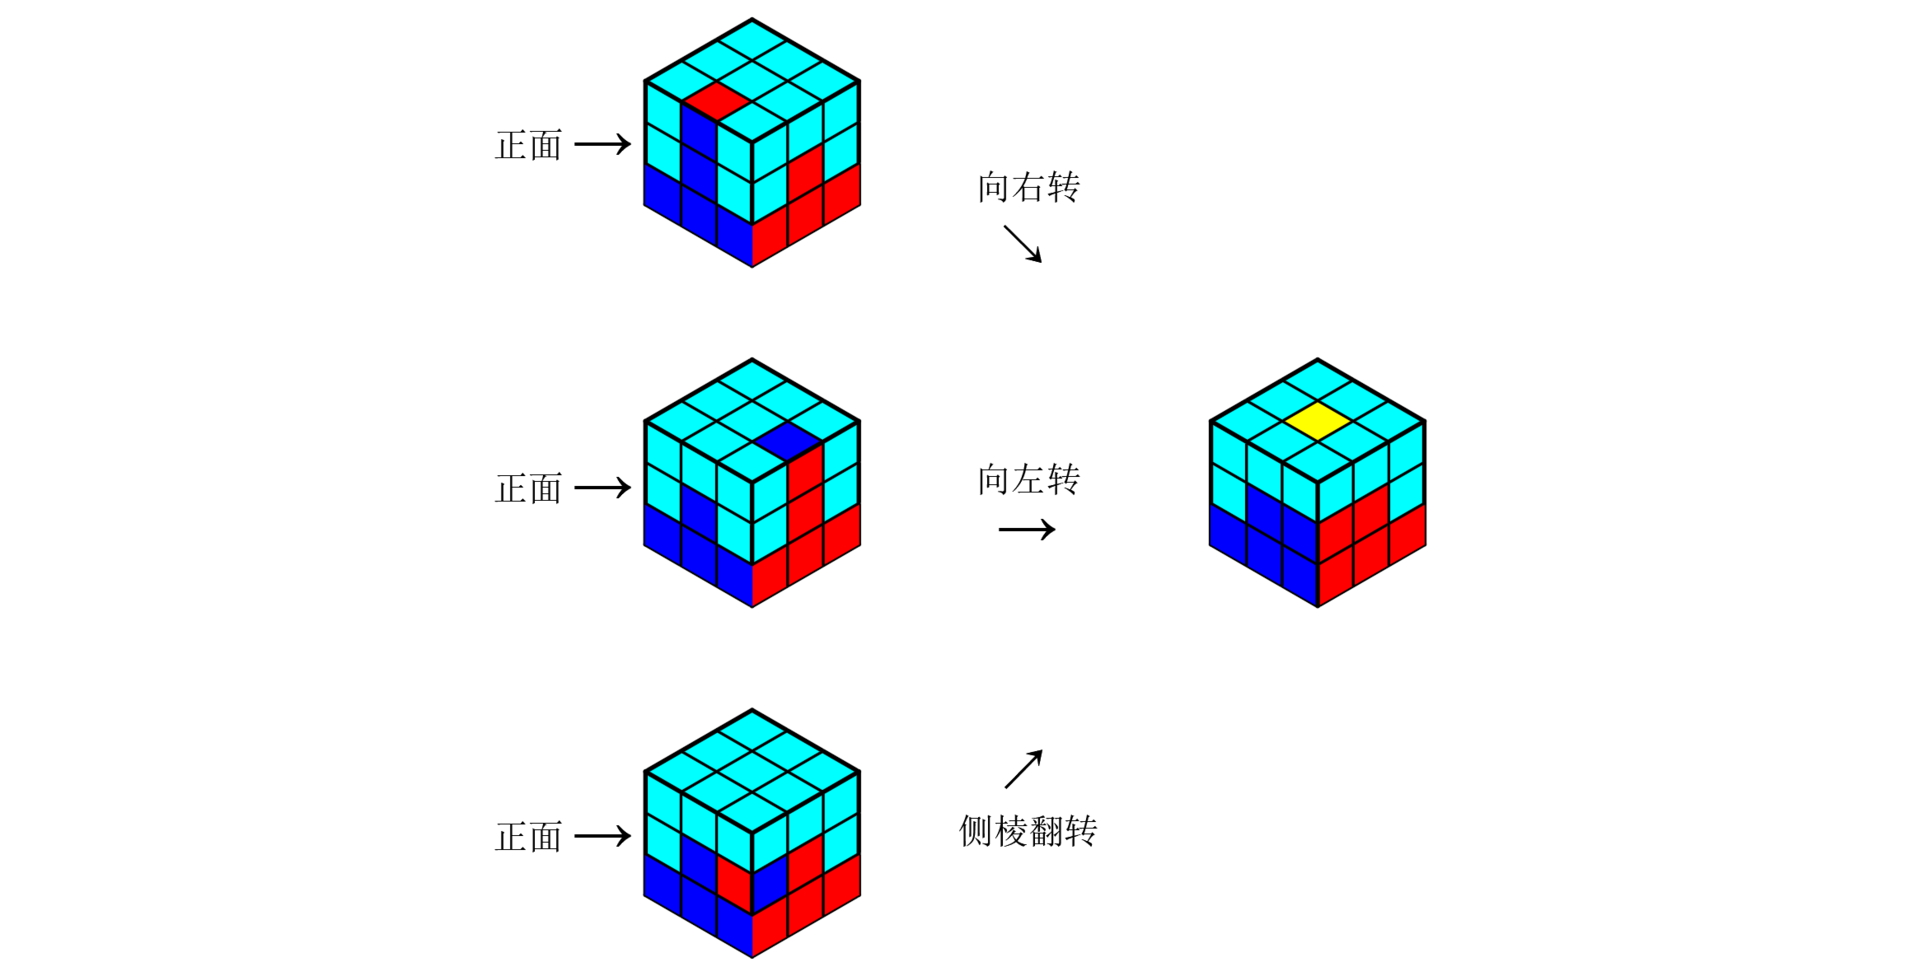
- Case 1 (Right shift): Use Formula 1-5, Formula 1-8 or Formula 1-10 to solve it.
- Case 2 (Left shift): Use Formula 1-6, Formula 1-9 or Formula 1-11 to solve it.
- Case 3 (Side edge flip): Use Formula 1-7 to solve it.
① General Formulas (Refer to the above figure for the front face rotation reference of these formulas)
Formula 1-6: R' F' R U R U' R' F
Formula 1-7: R U2 R' U R U2 R' U F' U' F
② Clockwise and Counterclockwise Formulas
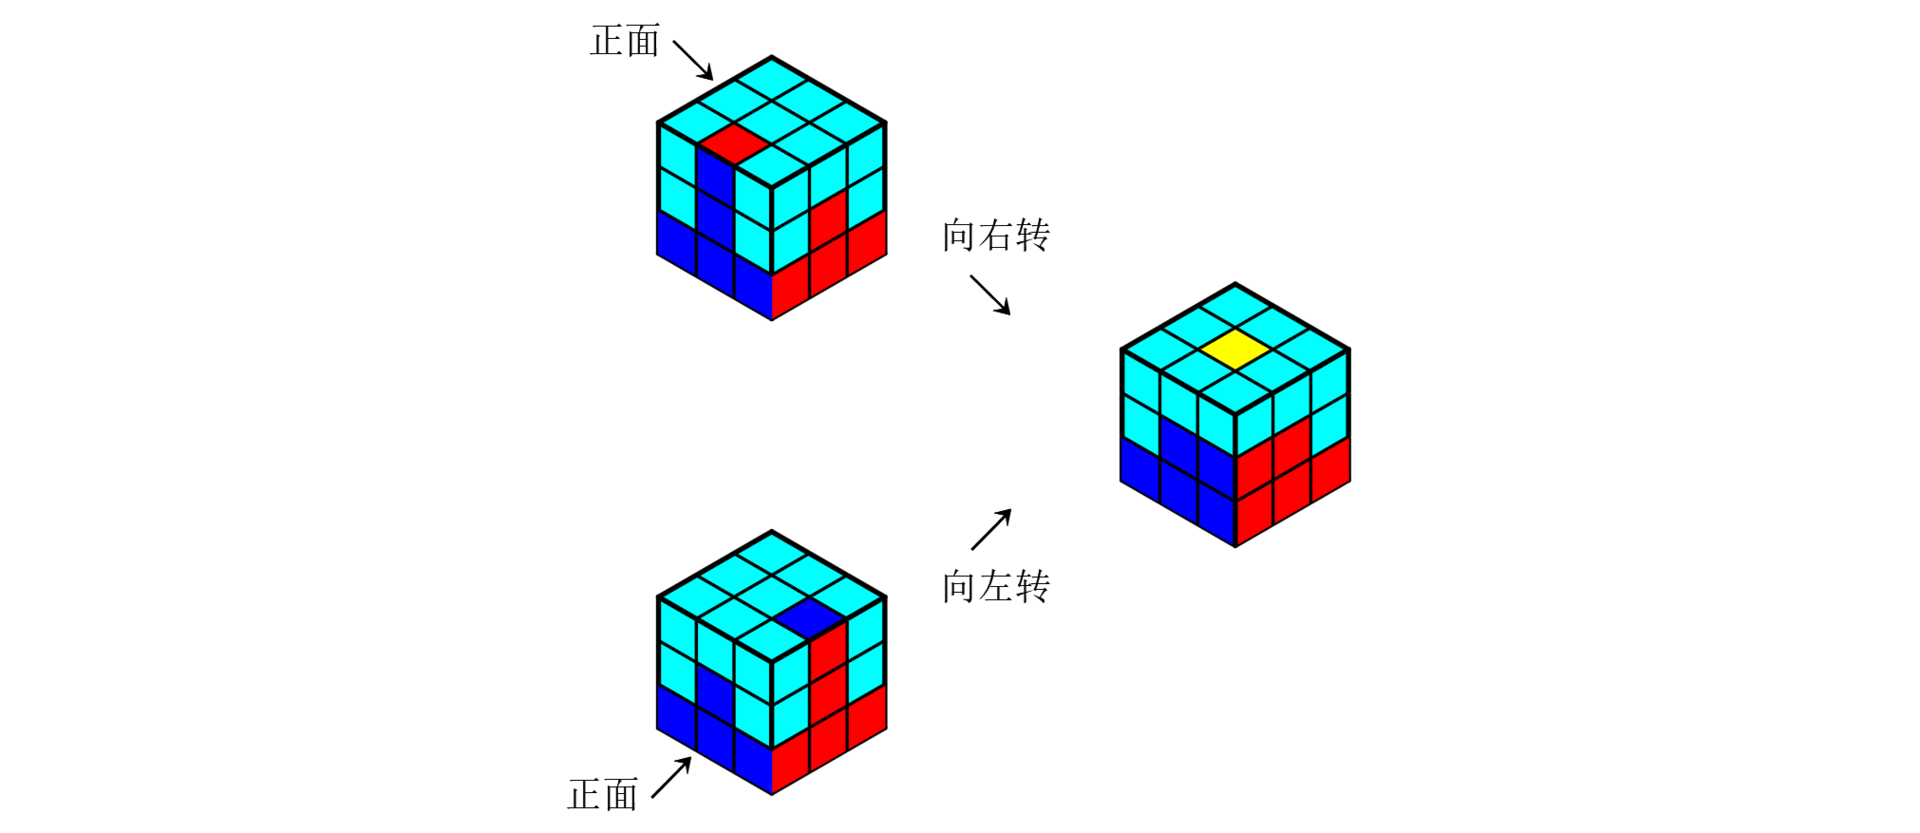
Formula 1-9: R' U' R' U' R' U R U R (Five counterclockwise and four clockwise)
Refer to the figure below for the front face reference of these formulas:
③ Symmetric Formulas
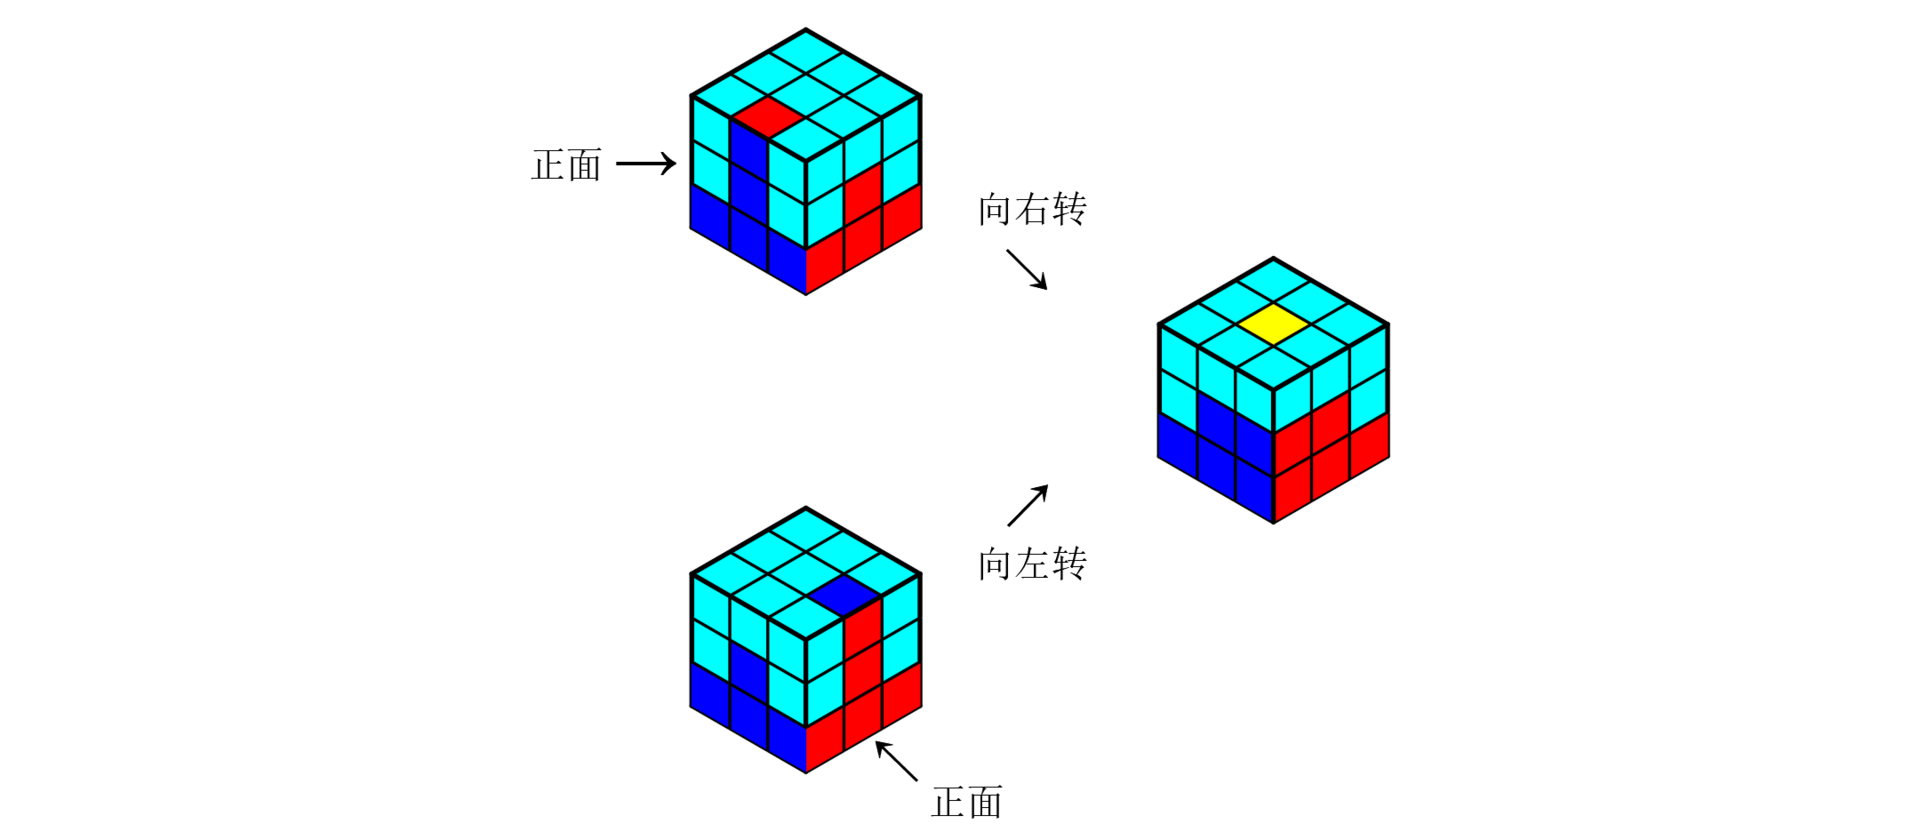
Formula 1-11: U' L' U L U F U' F'
Refer to the figure below for the front face reference of these formulas:
3. Solve the Top Layer ⚓︎
3.1 Solve the Top Cross ⚓︎
Solving the top cross covers four stages: dot stage, corner bend stage, horizontal line stage and cross stage (the final stage).
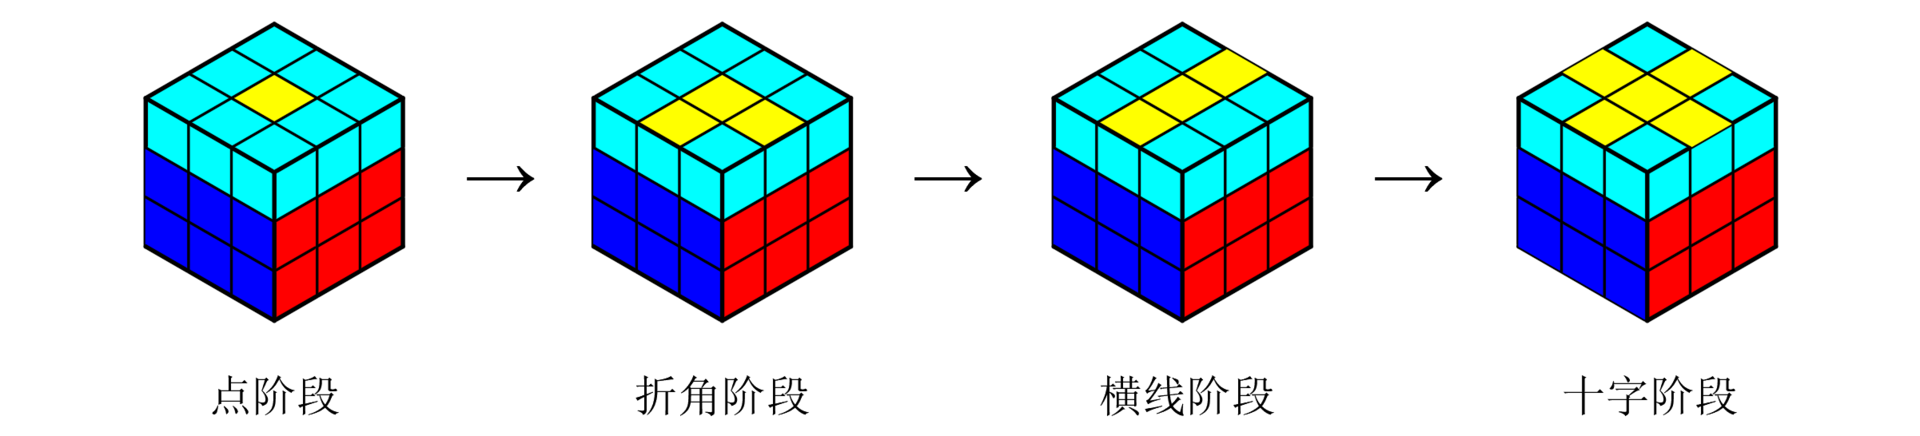
Formula 1-12 can convert one stage to another. However, if the position of the top face is not adjusted, you may get stuck in a loop and fail to reach the final cross stage.
The figure below shows 8 possible states of the top cross:

The following illustrates the resulting top state after applying Formula 1-12 once to a certain top cross state. Follow the rules below and your own top face state, and use Formula 1-12 together with Formula U / U’ to solve the top face into the cross stage.
Ⅱ
Ⅲ
Ⅳ
Ⅴ
Ⅵ
Ⅶ
Ⅷ
→
→
→
→
→
→
→
Ⅵ
Ⅲ
Ⅶ
Ⅴ
Ⅰ
Ⅷ
Ⅳ
3.2 Solve the Top Face ⚓︎
Formula 1-14: R U2 R' U' R U' R'
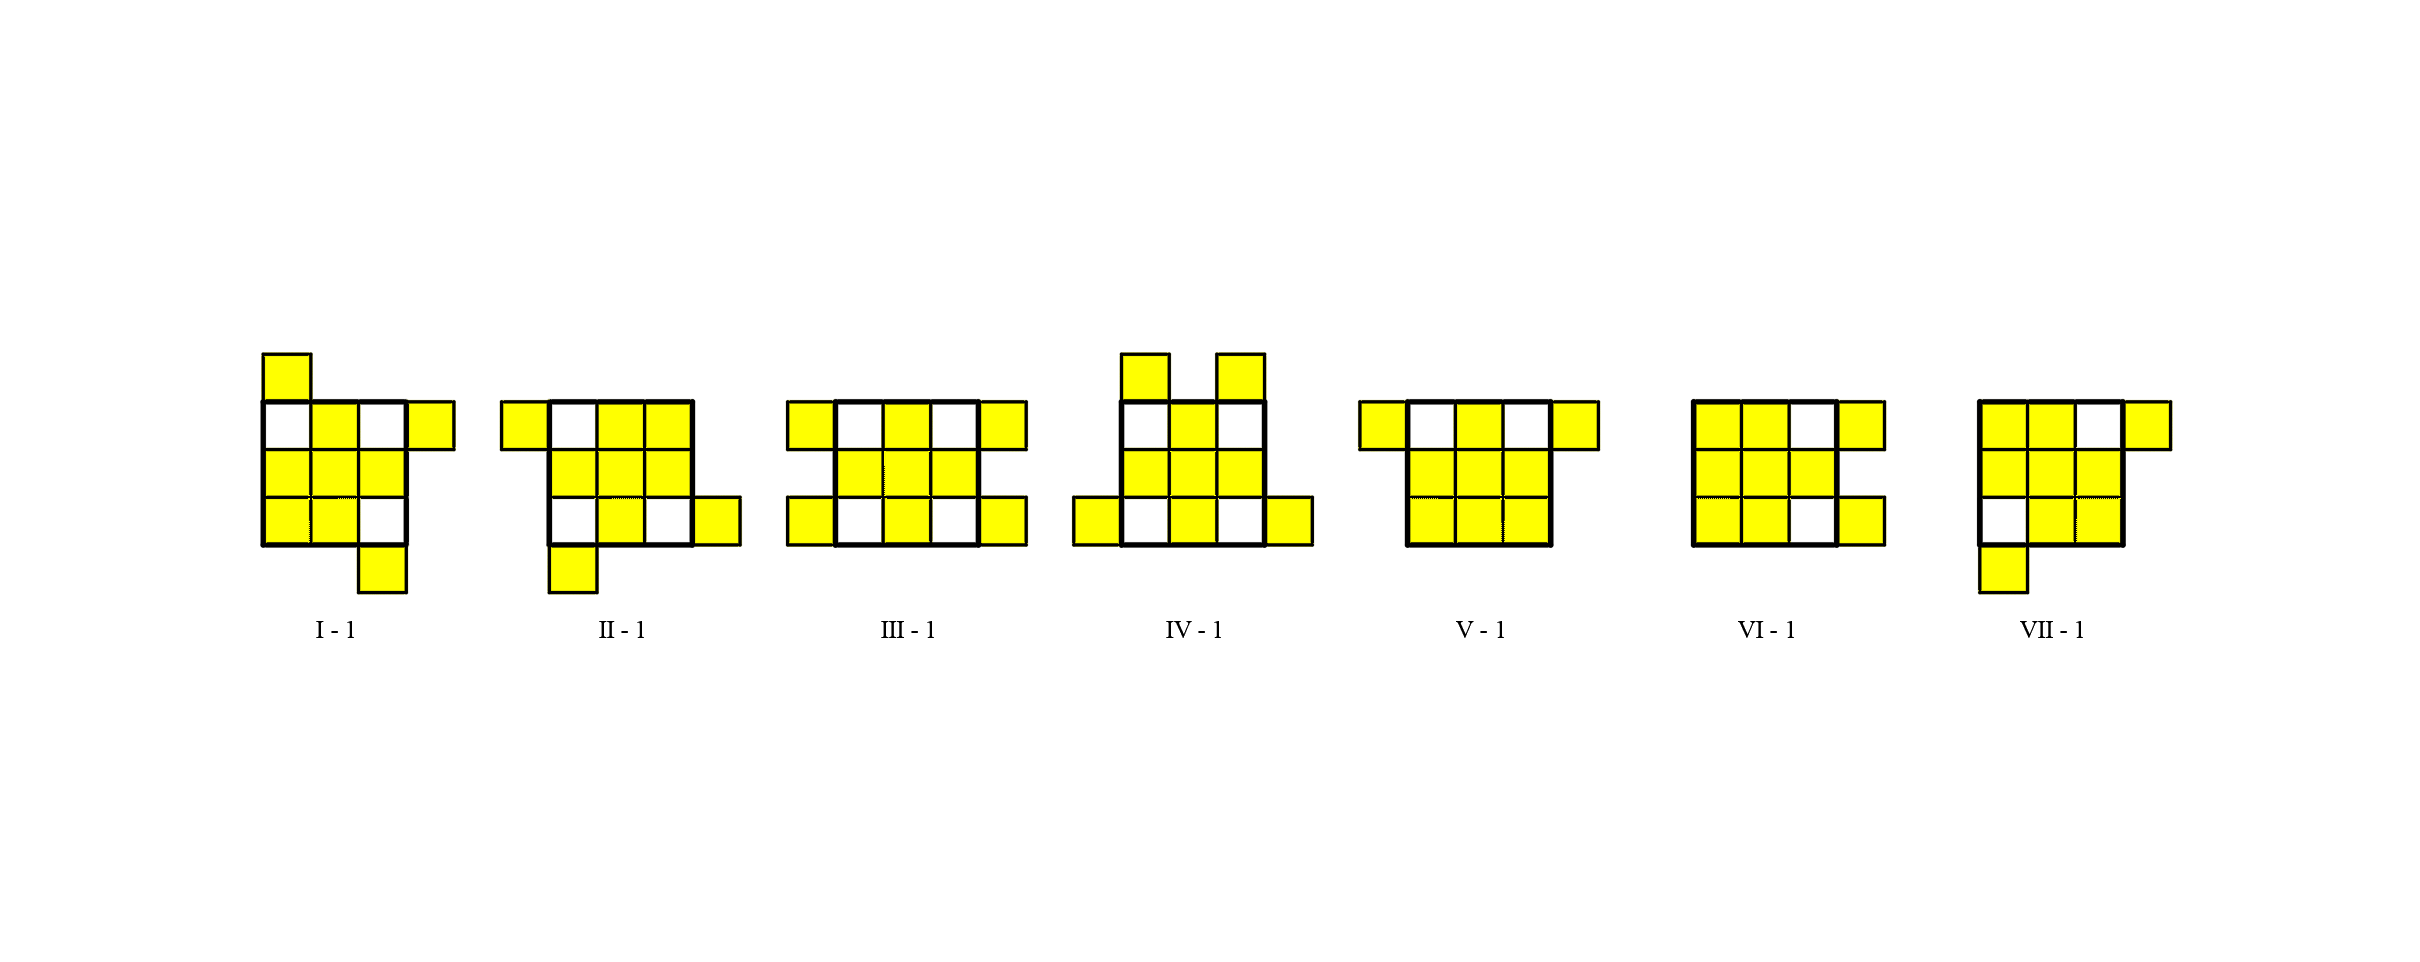
The figure below shows 7 possible top-face states after finishing solving the top cross.
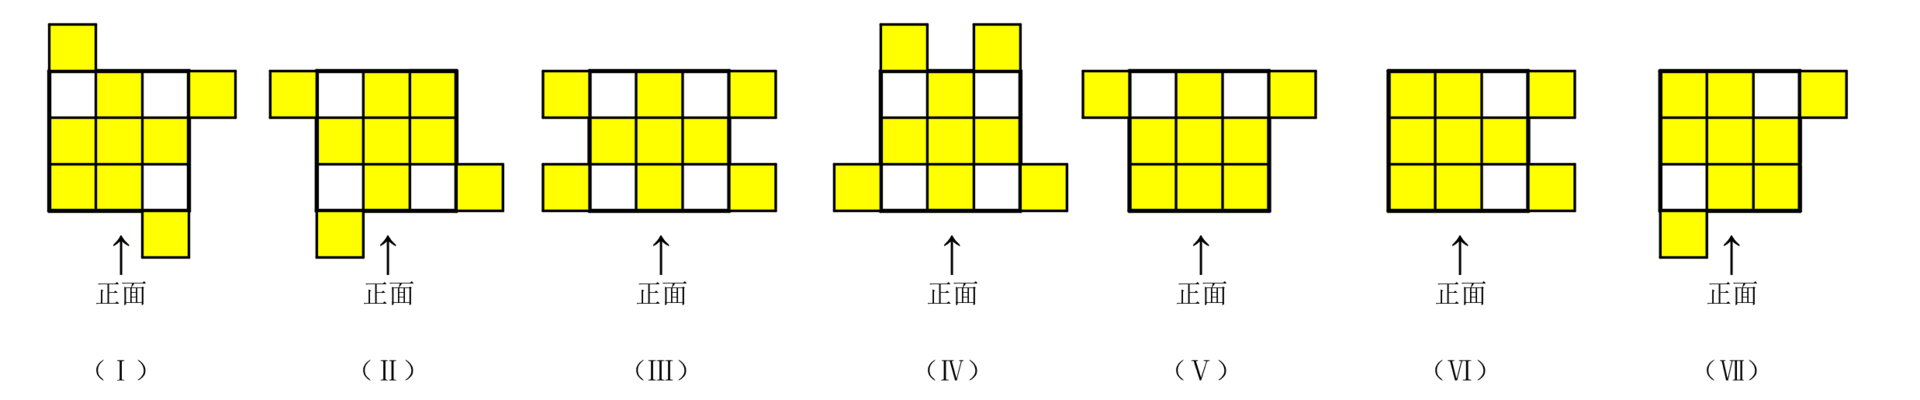
Listed below are the corresponding formulas for solving each of the seven states:
Ⅱ
Ⅲ
Ⅳ
Ⅴ
Ⅵ
Ⅶ
:
:
:
:
:
:
Formula 1-14
Formula 1-13 + Formula 1-13
Formula 1-13 + U + Formula 1-13
Formula 1-14 + U + Formula 1-13
Formula 1-14 + U' + Formula 1-13
Formula 1-13 + U2 + Formula 1-14
For solving more states of the top face, please refer to: All States, Transformations and Solving Steps for the Top Face of a 3×3 Rubik’s Cube
3.3 Solve the Four Top Corner Pieces ⚓︎
- First check if there are corner pieces with identical colors on the side faces of the top layer. If such corners exist, set the face with matching colored corners as the front face, then use Formula 1-15 to align the colors of the left and right top corner pieces on all four side faces.

- If no side face of the top layer has matching colored corners, pick any face as the front face and apply Formula 1-15. After this operation, one side face will get matching colored corners. Set that face as the new front face and run Formula 1-15 again to finish this step.

- Finally rotate the entire top layer to match the colors of the top left and right corner pieces with the side colors of the two lower layers.
3.4 Solve the Top Layer Edge Pieces ⚓︎
Each time Formula 1-16 is applied, the cube transforms as shown in the figure below:

- First, check if there is a side face of the top layer whose middle edge shares the same color as its left and right corner pieces. If such a face exists, set the opposite face of this side as the front face and use Formula 1-16 to solve it. If it is not solved after one run, apply Formula 1-16 a second time to complete the alignment.
- If no side face has a middle edge matching the colors of its two adjacent corners, pick any face as the front face and run Formula 1-16. Afterwards, one side face will have fully aligned side colors. Set the opposite side of this aligned face as the new front face, then use Formula 1-16 to finish solving.

III. 2x2 Rubik’s Cube ⚓︎
A 2x2 Rubik’s Cube is essentially a 3x3 Rubik’s Cube with all edge pieces removed, so it can be solved by following part of the solving steps for a 3x3 cube.
1. Solve the Bottom Layer ⚓︎
Formula 2-2: F D2 F' D' (Right side) / F' D2 F D (Left side)
- Find a corner piece with white, set the white face as the top face, and memorize the other two colors of this corner.
- Case 1: White corner is on the bottom layer of a side face
- Method 1: Match bottom color
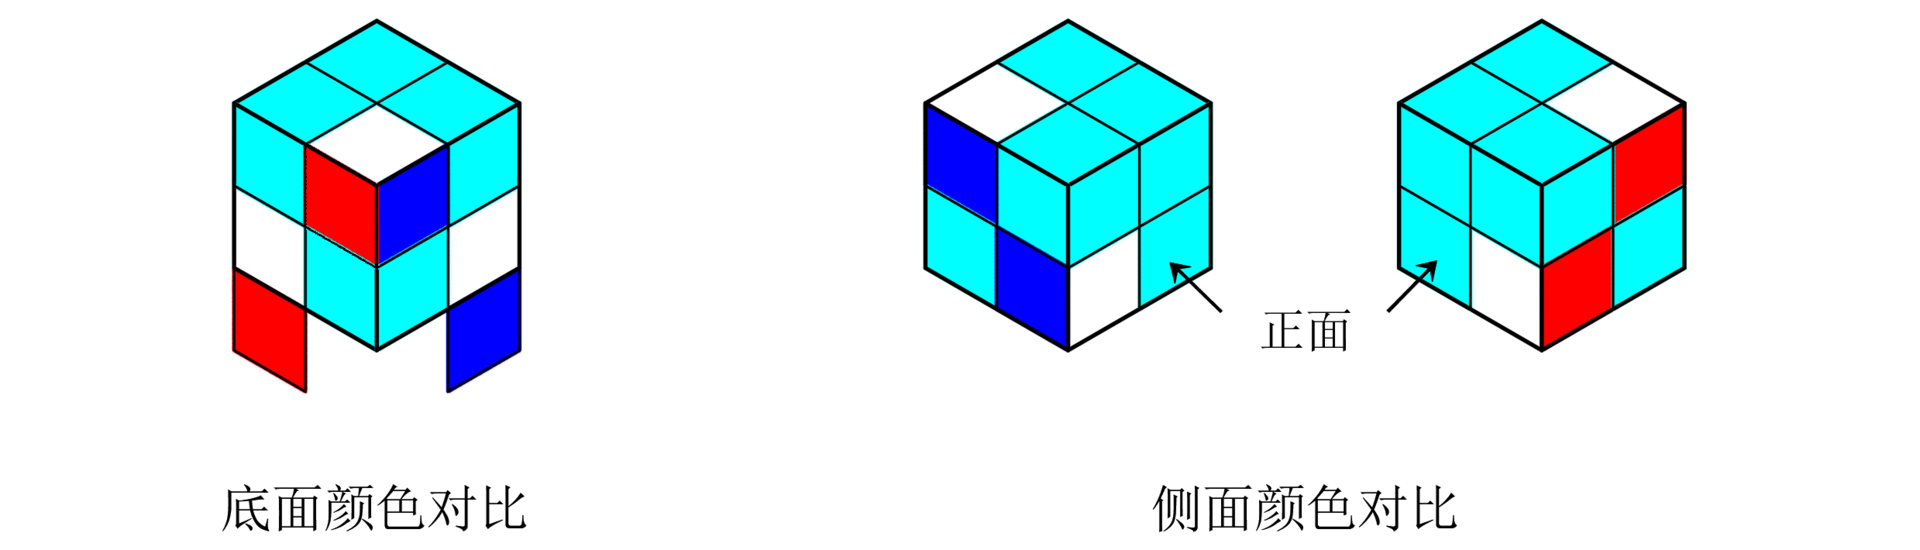
Locate the white corner on the bottom side layer. If the corner is on the left (right) bottom, align its bottom color with the top-right (top-left) corner color of the front face.
When solving the 2nd or 3rd white corner, simply turn L’ or R to place it; for the final white corner, apply Formula 2-1. - Method 2: Match side color
Locate the white corner on the bottom side layer. If the corner is on the left (right) bottom, align its side color with the top-left (top-right) corner color of the left (right) face, then apply Formula 2-1 to solve it.
- Choose either method when the matching condition is met; there is no need to strictly follow only one method.
- Case 2: White corner is on the top layer of a side face
Just like the 3x3 cube, use Formula 2-1 to move the white top-layer corner down to the bottom side layer, then solve it following the steps in Case 1.
You may directly rotate the layer containing the white corner as long as already aligned corners stay undisturbed.
- Case 3 below follows the same rule.
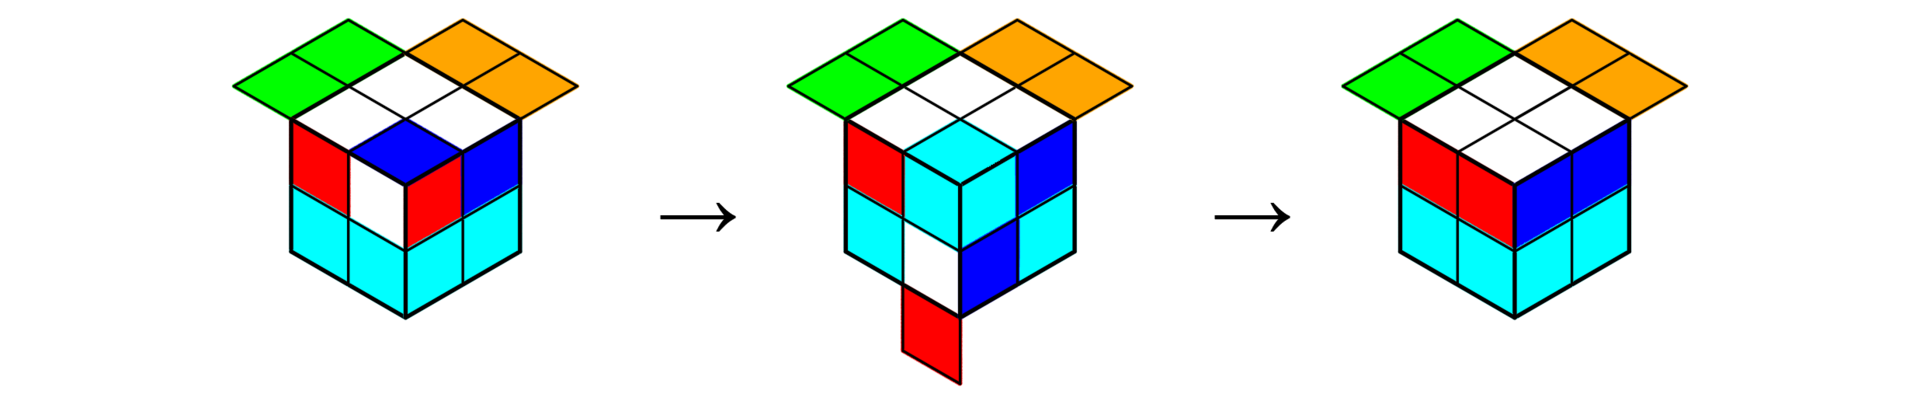
- In the figure below, only two white top corners are solved, so you may directly rotate the right layer for adjustment.

- In the figure below, three white top corners are already solved. You must first use Formula 2-1 to shift the white top corner to the bottom side layer, then solve it with Formula 2-1 as instructed in Case 1.
- Case 3: White corner is on the bottom face
Just like the 3x3 cube, use Formula 2-2 to move the white bottom-face corner to the bottom side layer, then solve it following the steps in Case 1.
You may directly rotate the layer containing the white corner as long as already aligned corners stay undisturbed.
2. Solve the Top Layer ⚓︎
2.1 Solve the Top Face ⚓︎
Formula 2-4: R U2 R' U' R U' R'
The figure below shows 7 possible top-face configurations after completing the bottom layer.
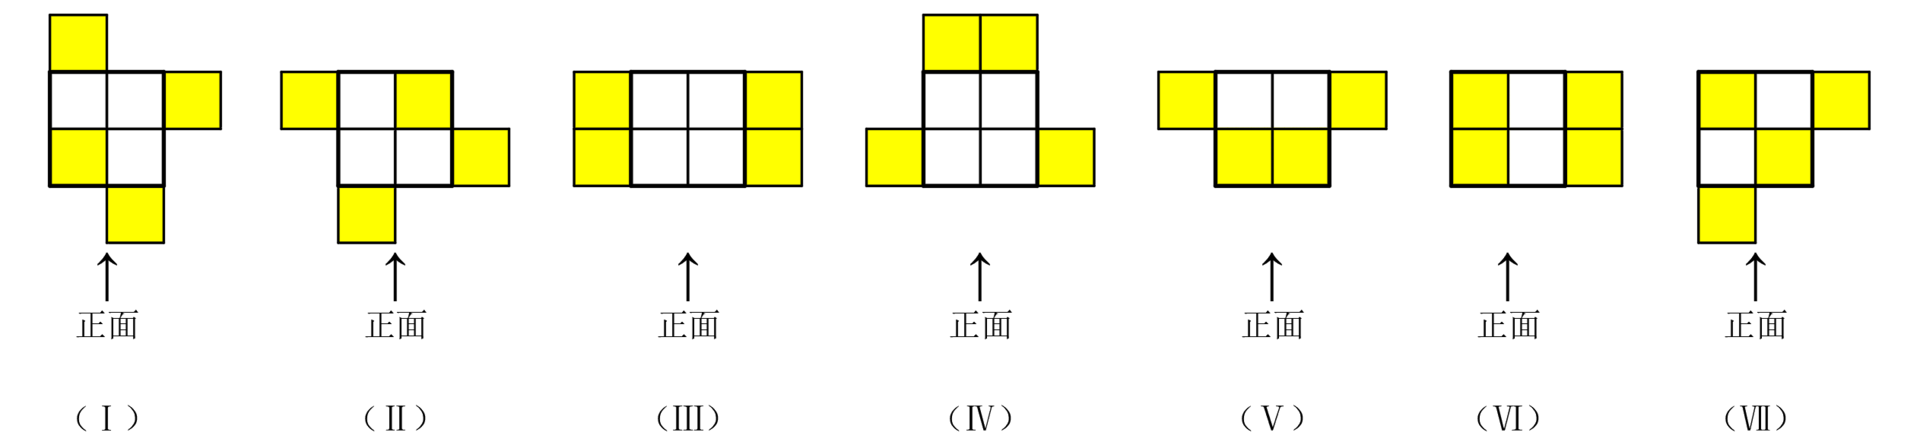
The corresponding solving formulas for these seven states are listed below:
Ⅱ
Ⅲ
Ⅳ
Ⅴ
Ⅵ
Ⅶ
Formula 2-4
Formula 2-3 + Formula 2-3
Formula 2-3 + U + Formula 2-3
Formula 2-4 + U + Formula 2-3
Formula 2-4 + U' + Formula 2-3
Formula 2-3 + U2 + Formula 2-4
2.2 Solve the Four Top Corner Pieces ⚓︎
- First check whether there are corner pieces with matching colors on the lateral sides of the top layer. If such a side exists, take that face with matching corners as the front face, then apply Formula 2-5 to align the colors of the left and right top corners of all four lateral faces.
- If no lateral face of the top layer has matching colored corners, set any random face as the front face and run Formula 2-5. After execution, one side will appear with matching corner colors. Take that face as the new front face and apply Formula 2-5 again to finish this step.

- Lastly, rotate the entire top layer to align the side colors of the top and bottom layers.
IV. 4x4 Rubik’s Cube ⚓︎
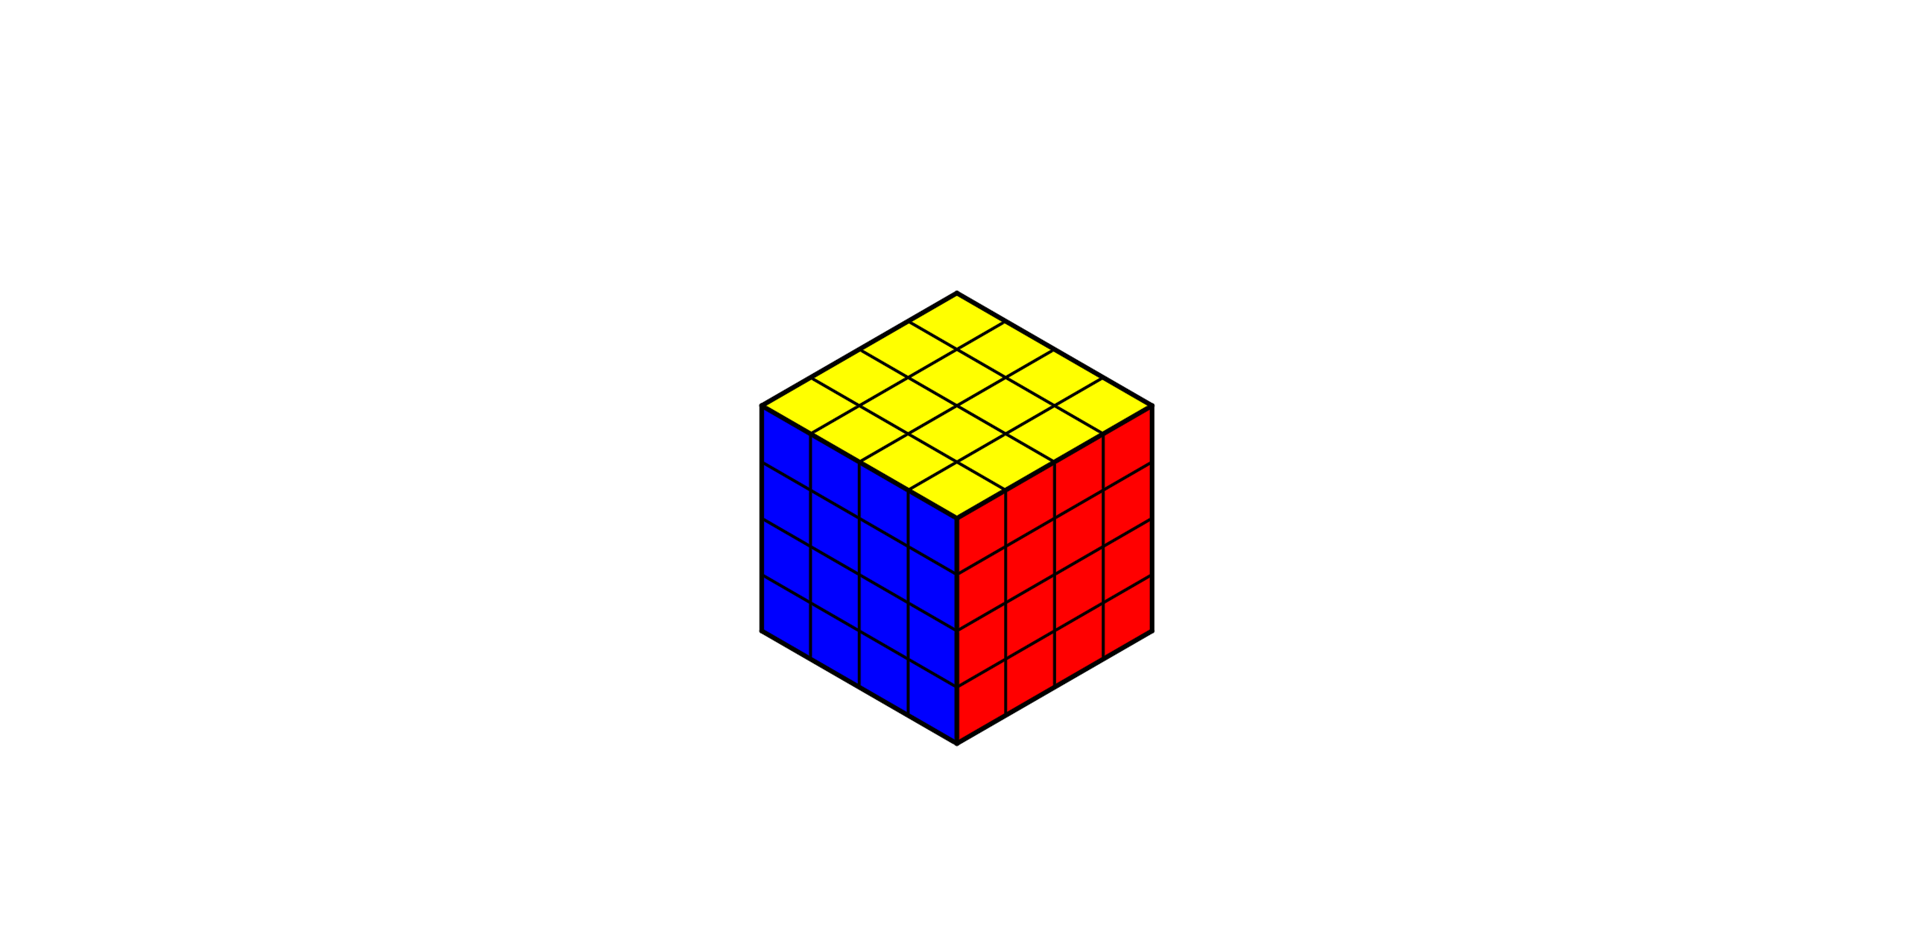
Unlike the 3x3 cube, the 4x4 Rubik’s Cube does not have fixed center pieces. Therefore, you need to memorize the relative color positions of the six faces before solving it. The international standard color scheme is: Top = Yellow, Bottom = White, Front = Blue, Back = Green, Left = Orange, Right = Red.
1. Solve the Center Pieces ⚓︎
1.1 Solving Order ⚓︎
To avoid disrupting already solved center blocks during assembly, the recommended solving sequence for the six center sections is as follows: First solve the center blocks of the three faces adjacent to a single corner of the cube, then finish the center blocks of the remaining three faces.

1.2 Solving Steps ⚓︎
Formula 3-2: T₂R U2 T₂R'
- Solve the first three pieces of the first center block
There is no specific formula for this step. Rotate all faces and layers to solve the first three pieces of the first center block. - Solve the last piece of the first center block
- If the last piece is on an adjacent face of the first face, align the two faces to the position shown in Figure 26, then apply Formula 3-1 to complete the solve.
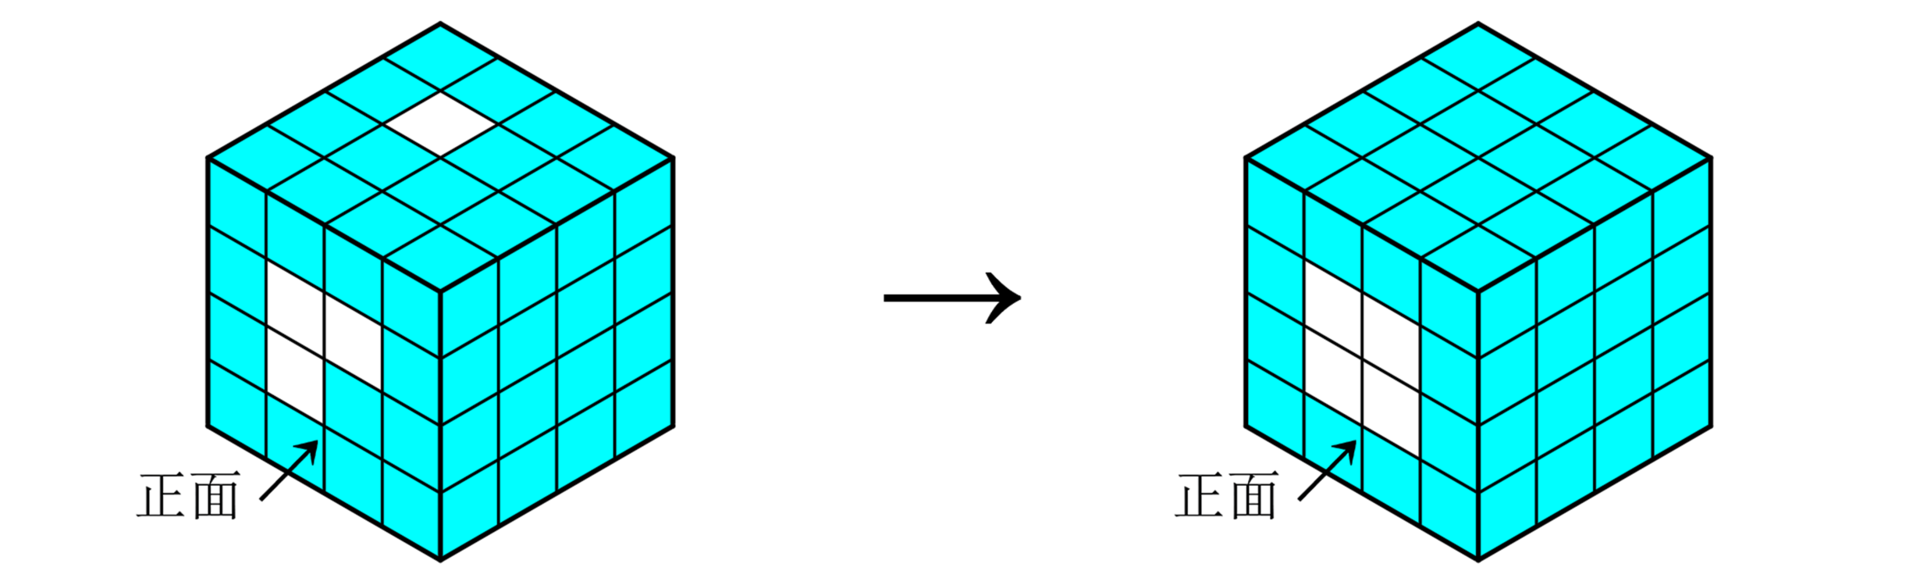
- If the last piece is on the back face of the first face, follow the method above and execute Formula 3-1 twice. First move the last piece from the back face to an adjacent side face, then shift it to the target first face to finish the first center block.
- Solve center blocks of all remaining faces
Solve the center blocks of other faces using the same method for the first center block. Important note: when rotating faces and layers to set up the first three pieces of any center block, ensure solved center blocks are not scrambled.
- Quick Strip Solving Method
While assembling center blocks, construct two short strips first. Align the two faces to the layout shown in Figure 27, then use Formula 3-2 to combine the two short strips into a complete center block.
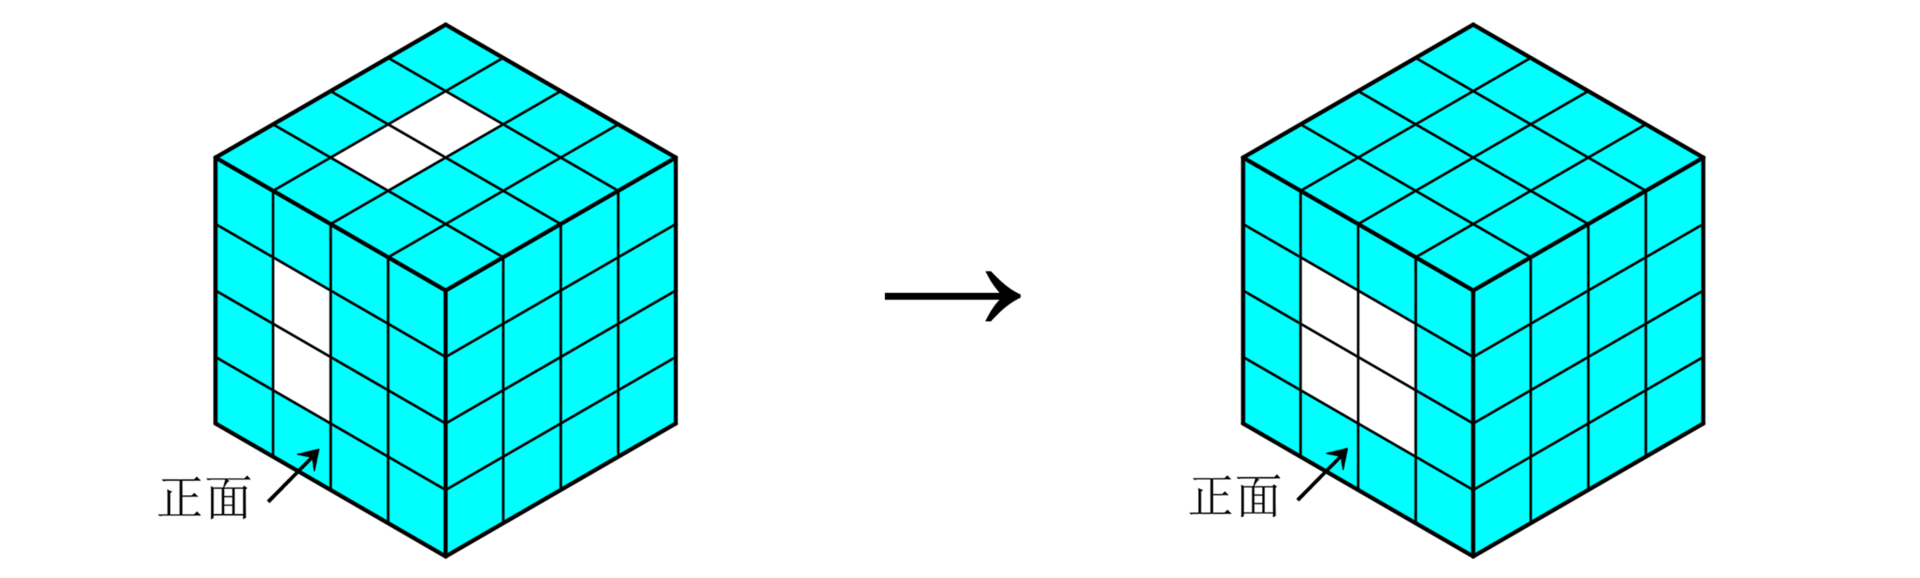
2. Solve Edge Pieces ⚓︎
Formula 3-4: R F' U R' F
- First move two edge pieces of the same color to the same face (the red-blue pieces are taken as an example in the figure below).
- Case 1: The two edge pieces are on the same layer
Directly apply Formula 3-3 to join the two red-blue edge pieces together (it works no matter if the two pieces are on the upper layer or lower layer).

- Case 2: The two edge pieces are not on the same layer
After using Formula 3-4, the two edge pieces will be on the same layer, then solve them following the steps of Case 1.

3. Solve the 3×3 Rubik’s Cube ⚓︎
After solving all center blocks and edge pieces, you may proceed to solve the cube following the standard steps for solving a 3×3 Rubik’s Cube.
4. Deal with Special Cases ⚓︎
Formula 3-6: M₂R2 U2 M₂R2 T₂U2 M₂R2 M₂U2
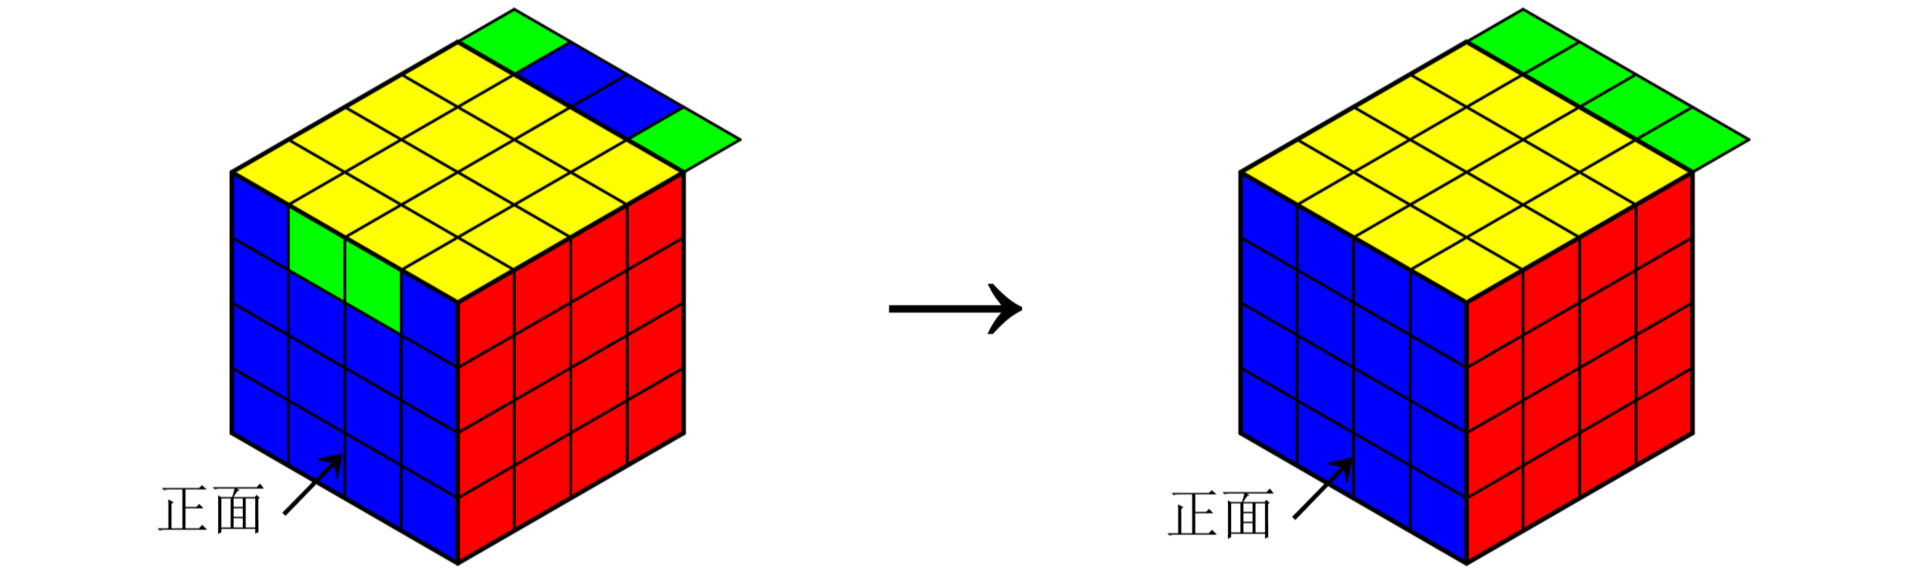
- Case 1: Edge Flip
- Occurrence Stage: Forming the top cross
- As shown below, you may fail to form the top cross while working on the top cross. Apply Formula 3-5 to flip up all yellow edge pieces.
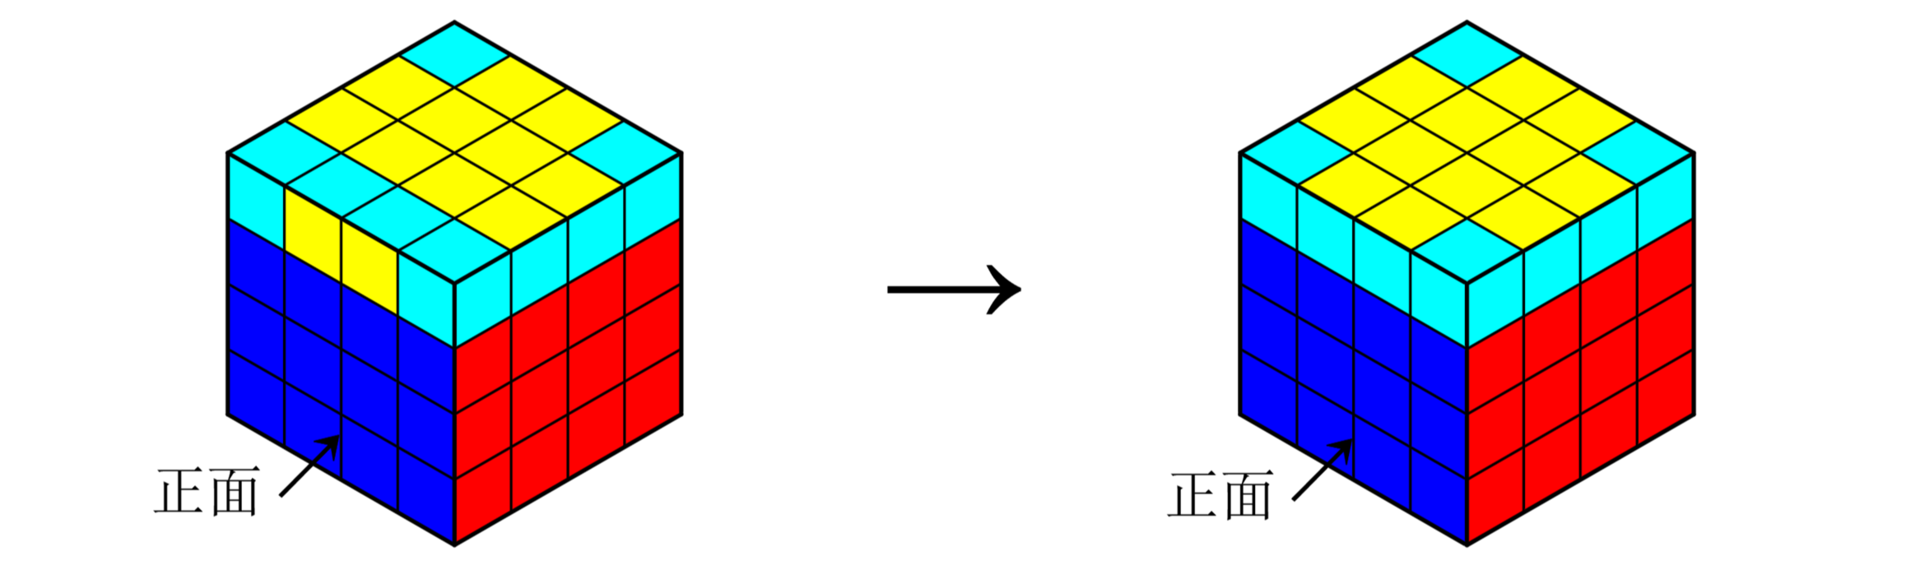
- Case 2: Opposite Edge Swap
- Occurrence Stage: Solving top layer edges
- As shown below, two side faces of the top layer may already have matching colors when solving top layer edges. Use Formula 3-6 to swap the opposite edges.
V. 5×5 Rubik’s Cube ⚓︎
1. Solve Center Blocks ⚓︎
1.1 Solving Order ⚓︎
- The six center blocks of a 5×5 Rubik’s Cube each consist of nine pieces. It is recommended to first form the cross of all six center blocks and then solve the corner pieces of each center block. Alternatively, you may first complete the cross on one face’s center block, solve its center corner pieces, and then tackle the center blocks of the remaining faces.
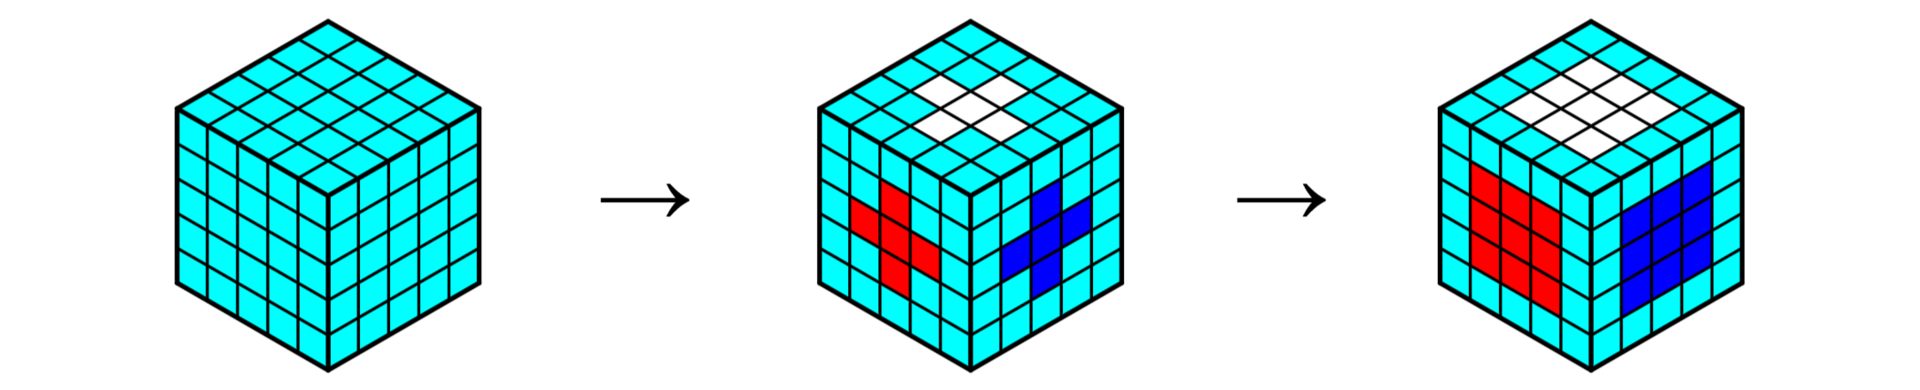
- To simplify solving and prevent scrambling already solved center blocks, the suggested solving order for the six center blocks is as follows: start by solving the center blocks of the three faces adjacent to one cube corner, then finish the center blocks of the other three faces.

1.2 Solving Steps ⚓︎
Formula 4-2: T₂R U T₂R' U T₂R U2 T₂R'
- Solve the Center Cross
- Solve the first center cross: There is no dedicated formula for this step. Rotate all faces and layers to form the cross of the first center block.
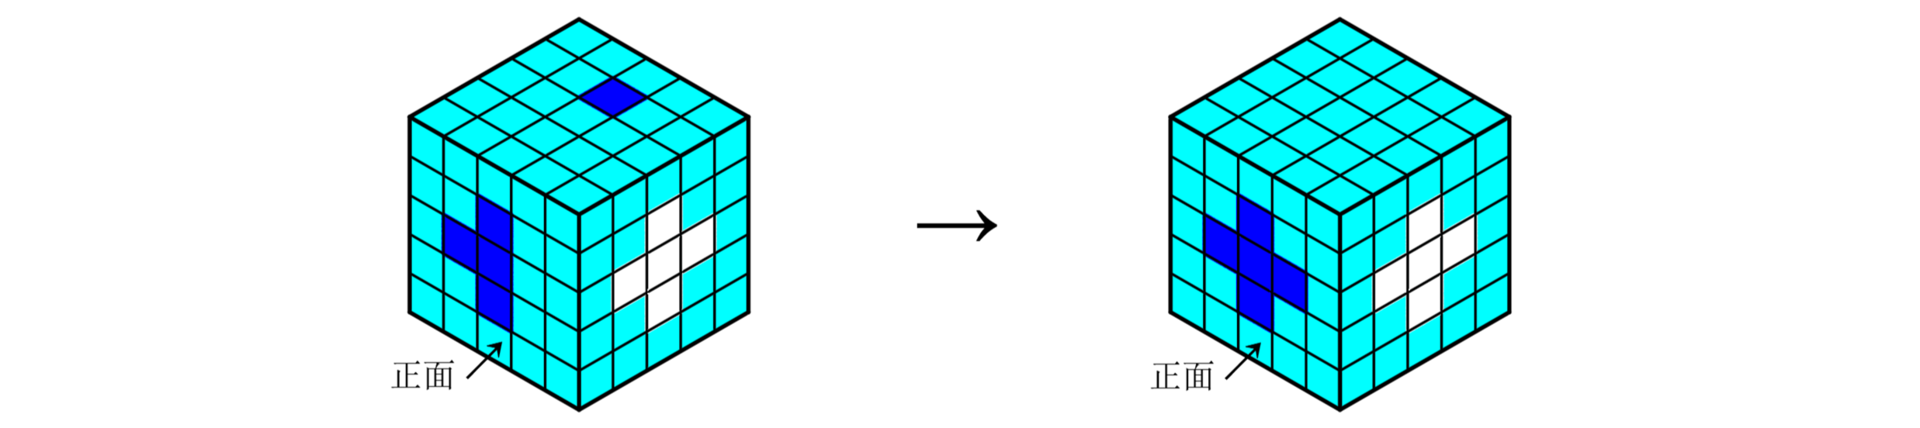
- Solve the remaining center crosses: You can still rotate faces and layers to form each center cross. If this scrambles any completed crosses, position the cube as shown in Figure 34 and apply Formula 4-1.
- Solve the Corner Pieces of Center Blocks
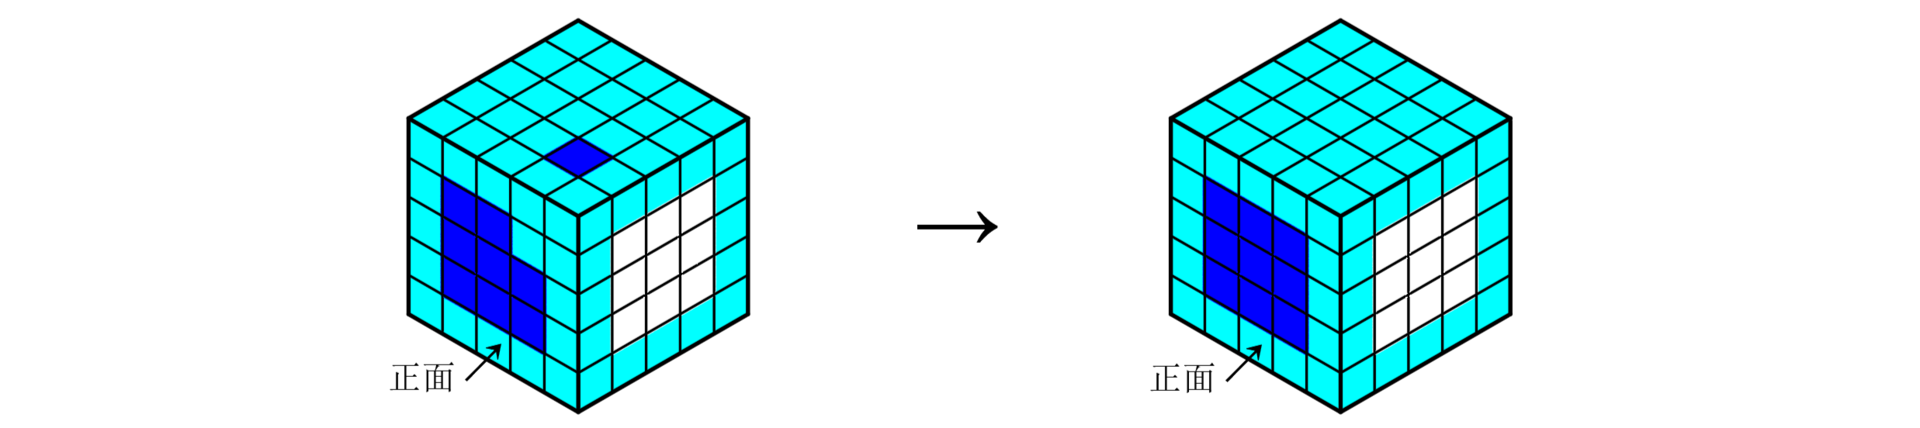
Position the cube as shown in Figure 35 and apply Formula 4-2 to solve them.
- During the above solving process, if the target cross piece or target corner piece is on the back of the working face, use Formula 4-1 to shift the target piece from the back to an adjacent face, then follow the steps above to complete the solve.
2. Solve Edge Pieces ⚓︎
2.1 Method One: Prioritize Interval Alignment ⚓︎
Formula 4-4: R F' U R' F
Formula 4-5: T₂R2 B2 T₂R' U2 T₂R' U2 B2 T₂R' B2 T₂R B2 T₂R' B2 T₂R2
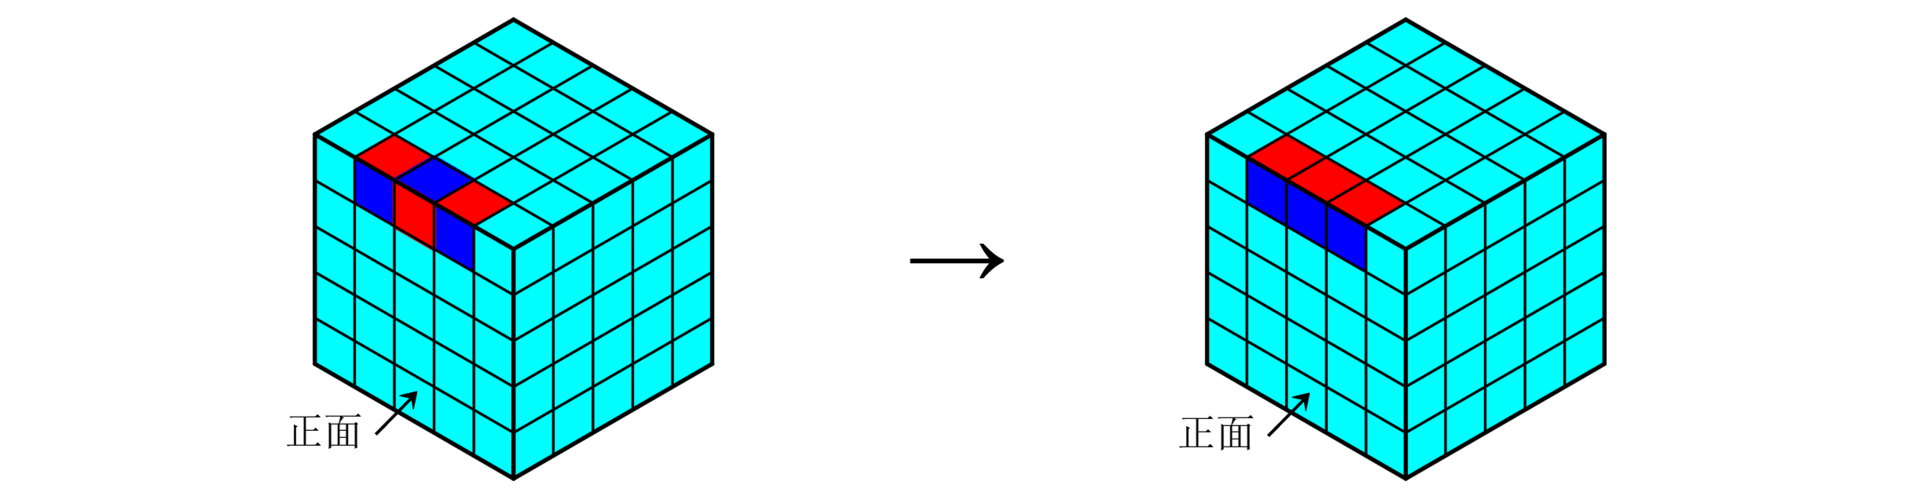
Formula 4-6: M₂R2 B2 U2 M₂L U2 M₂R' U2 M₂R U2 F2 M₂R F2 M₂L' B2 M₂R2
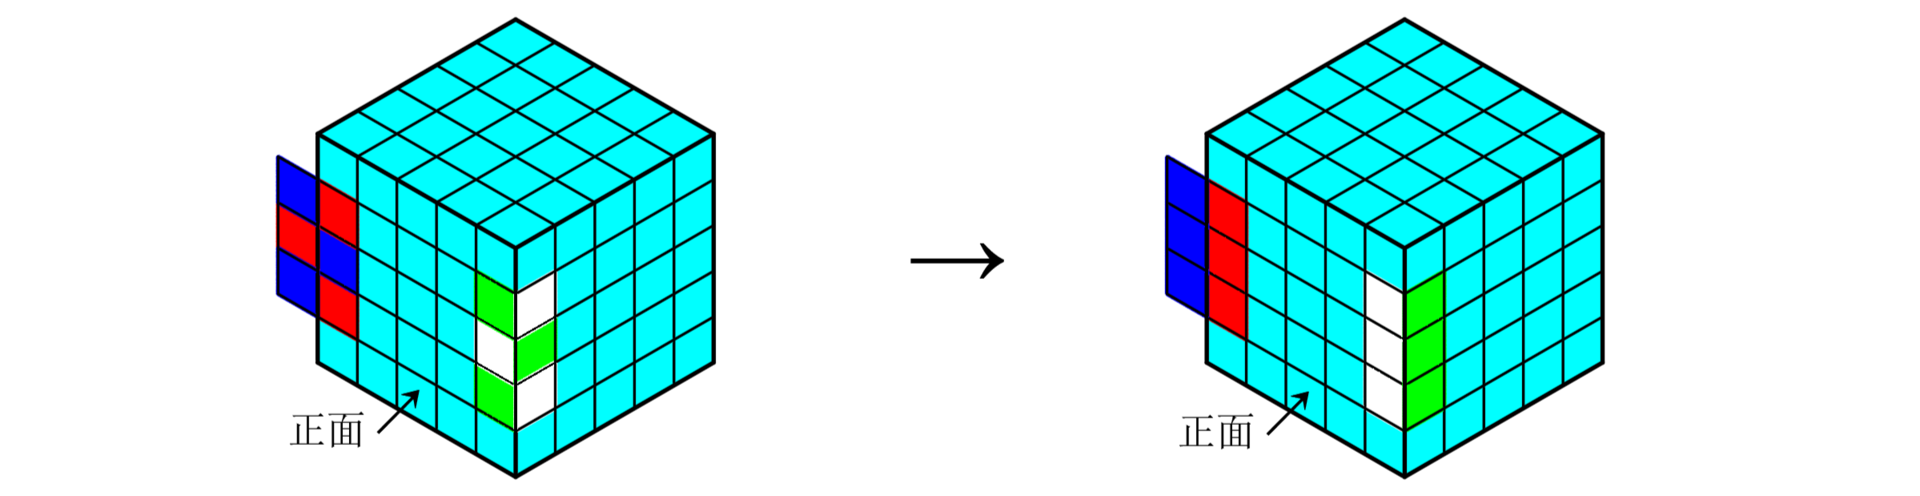
Formula 4-7: M₃U' R U R' F R' F' R M₃U
- Interval Alignment
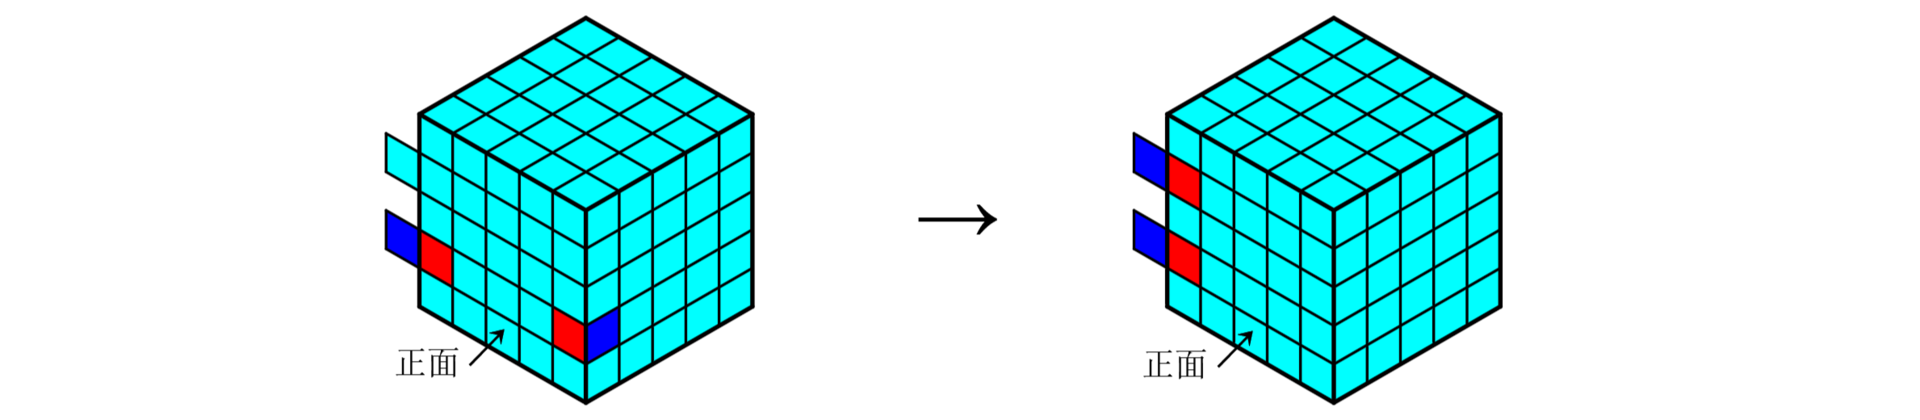
This operation follows the same steps used to solve edge pieces on a 4×4 Rubik’s Cube. First move two edge pieces of matching color onto the same face (the red-blue pieces are used as an example in the figure below). - Case 1: The two edge pieces are on the same layer
Apply Formula 4-3 to pair the two red-blue edge pieces into a complete side edge (this works whether the pieces are on the upper layer or lower layer).
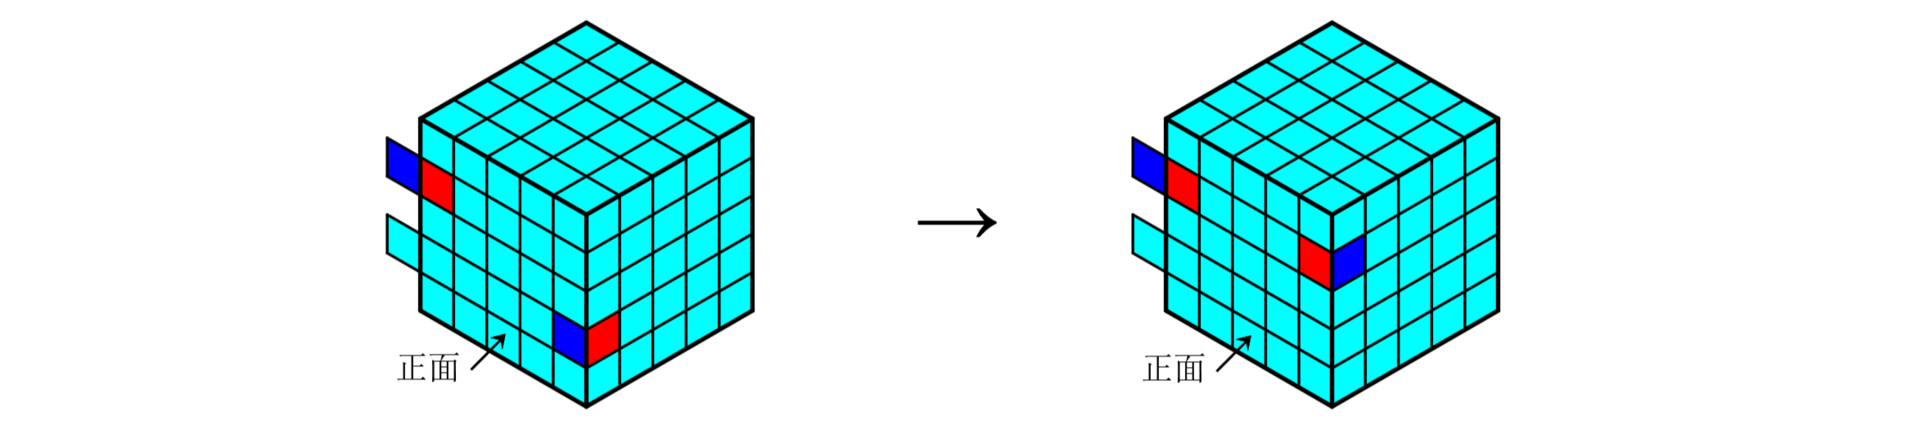
- Case 2: The two edge pieces are on different layers
Apply Formula 4-4 to place the two edge pieces onto the same layer, then solve them following the procedure for Case 1.
- Solve Middle Edge Pieces
As shown below, shift the target middle edge piece and the unsolved edge piece onto the same face, then apply Formula 4-5 to complete the solve.

- Resolve Edge Flips
- Single Edge Flip
After finishing the steps for solving middle edge pieces, the scenario shown below may occur. Apply Formula 4-6 to fix it.
- Paired Edge Flips
If multiple edges require flipping, position two unsolved edge pieces on opposite sides of one face, then apply Formula 4-7 to solve both edges at once.
2.2 Method Two: Prioritize Adjacent Alignment ⚓︎
Formula 4-9: T₂D R F' U R' F T₂D'
Formula 4-10: T₂U R F' U R' F T₂U'
Formula 4-11: T₂D' R F' U R' F T₂D
Formula 4-12: R F' U R' F (Right Side) / L' F U' L F' (Left Side)
- Adjacent Alignment
As shown in the figure, place the middle edge piece on the right and the edge piece to be paired with it on the left. If the target piece is on the second left layer, apply Formula 4-8 to solve it; if it is on the fourth left layer, apply Formula 4-9.
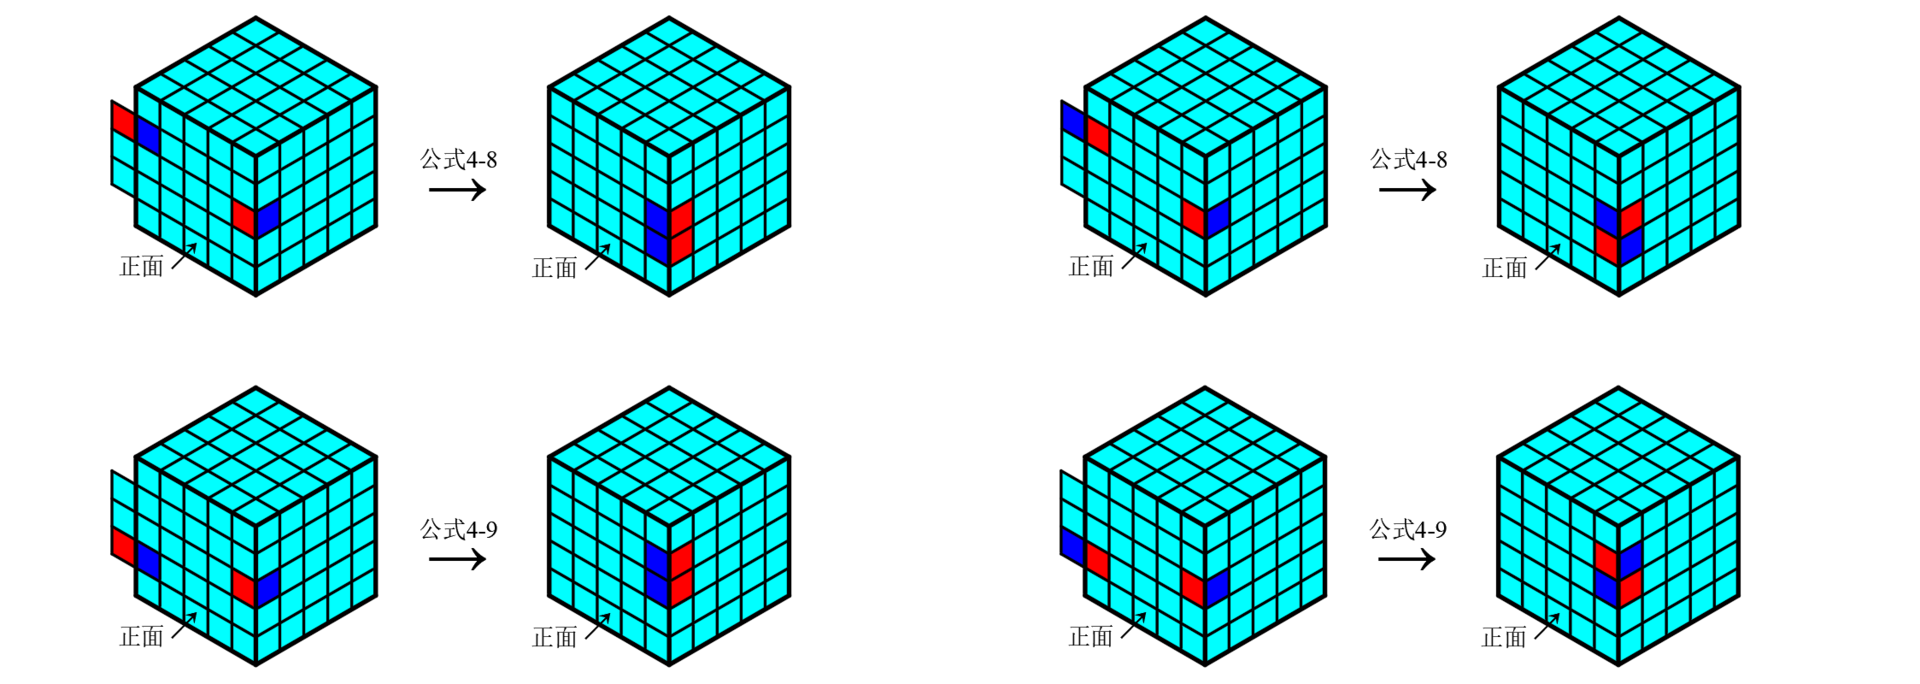
- Solve the Third Edge Piece
- The third edge piece is near the lower layer
As shown below, position the two pre-paired edge pieces from the previous step at the lower right, and the edge piece to be combined with them at the lower left.
Refer to the relative color positions of all edge pieces in the figure. If the colors of the pre-paired edges are aligned, use Formula 4-10 for solving; if their colors are misaligned, use Formula 4-9.

- The third edge piece is near the upper layer
As shown below, position the two pre-paired edge pieces from the previous step at the upper right, and the edge piece to be combined with them at the upper left.
Refer to the relative color positions of all edge pieces in the figure. If the colors of the pre-paired edges are aligned, use Formula 4-11 for solving; if their colors are misaligned, use Formula 4-8.

- If you need to adjust the colors of edge pieces on the left and right sides, apply Formula 4-12 to flip the two colors of the edge piece.

3. Solve the 3×3 Rubik’s Cube ⚓︎
After solving all center blocks and edge pieces, you may proceed to solve the cube following the standard steps for solving a 3×3 Rubik’s Cube.
 Wechat
 Alipay
Wechat Official Account has more content!